Make Shopping Convenient: Activate WooCommerce Vacation Mode
The thing that really puts e-commerce above brick-and-mortar retail is round-the-clock service. However, there is a limit to how much online store owners can cater to their buyer’s needs. Luckily, with WooCommerce vacation mode, you can keep things from descending into chaos.
This added feature benefits store owners, employees, and customers. And the best part is that it’s fairly easy to implement. All you need is a setup and the right plugin. Let’s dive in.
You Can’t Be There All The Time
Let’s say you run a booking site for renting wedding venues or hotel accommodation. The aim here is to make it easier for applicants to get booked. In theory, this leads to greater traffic and booming business, benefiting everyone involved. In practice, though, things can play out quite differently.
Your site can become overwhelmed with requests and inquiries. This can put the pressure on your staff, which is why they’re entitled to time off and regular breaks.
Plus, in the ensuing chaos, someone might become invested in a listing that’s already taken. This is especially a risk outside working hours or during break time or separate shifts. A simple misunderstanding such as this impacts your reputation as well as employee morale.
And it’s not just an issue for online booking platforms. Any business that serves multiple customers at a time or demands appointments is at risk. This includes emergency plumbers, home bakers, therapy or beauty clinics, and more.
How WordPress Vacation Mode Aids You
A vacation or holiday mode lets WooCommerce stores put a temporary pause on certain store functions. The idea isn’t to put everything on hold. To maintain site visits and SEO, your store can remain at least partly accessible.
But to manage traffic and customer expectations, you’ll be setting up a window where you’re not immediately available. This could be during lunch breaks or off-duty hours for all or certain members of your staff.
On the other hand, if you’re handling your online business alone, you might have to put everything on pause. This can happen during an illness or domestic emergencies.
Either way, vacation mode lets you maintain transparency. It can be anything from a “We’ll be with you shortly” message for live chat, or a scheduled period of inactivity. Thus, you can manage your itinerary, your staff’s workload, and customers’ expectations in one fell swoop.
Key Advantages of Setting Up Vacation Mode
- More Focused Business Management
WordPress vacation mode allows business owners to tend to existing customers more effectively. It helps postpone new requests and inquiries until there is an opening for them.
This gives you more control over your responsibilities and improves your quality of service. Additionally, it helps move forward with store maintenance without compromising SEO.
- It’s HR-Friendly
All employees deserve the option to recover from the stress and pressures of their work. Everyone deserves a break, from virtual receptionists and support teams to administrative and CRM staff.
Vacation mode halts inquiries for unavailable services and interactions outside designated work hours. This lowers the burden on workers and saves them a great deal of inconvenience.
- Offers Transparency
Taking customers off-guard with sudden unavailability or double bookings can leave a bad impression. This feature can inform customers of work hours or momentarily unavailable services or properties. This leads to fewer cancellations and a more positive overall experience.
- Actively Benefits Buyers
WordPress holiday mode basically allows buyers to set up an online queue. The difference is that they can more easily predict when you’re available for service or assistance. Plus, it allows you to manage expectations and gather insights about user behaviour. This results in a net positive experience for buyers, allowing your business to thrive.
Setting Up Vacation Mode: Step-by-Step
- Basic Vacation Mode
1.1. Install and activate the Woo Store Vacation plugin in WooCommerce.
1.2. Navigate to WooCommerce > Settings > Store Vacation and find the Schedule option.
1.3. Click Add New and start by giving your schedule a title.
1.4. Add a time window in the ‘From’ and ‘To’ fields.
1.5. Deselect the No Notice to Display option in order to announce your message to visitors.
1.6. Allow certain products and functions to be accessible during Vacation mode through Conditions.
1.7 In the main tab, go to the Notice section and click Add New.
1.8. Enter a title and add the ‘Message’ with which you’ll be notifying your buyers of the impending closure.
1.9. Click on Save Changes.
- Set up Working Hours
2.1. Find the plugin through your WooCommerce admin panel and navigate to Weekday.
2.2. Select the closing Day for your online business.
2.3. Repeat steps 1.4 to 1.6, this time setting daily working hours in the ‘From’ and ‘To’ fields.
2.4. Save changes.
A Step Towards Practical E-Commerce
Online businesses need to set achievable goals if they wish to succeed. Effective CRM depends on transparency and notifying your buyers of your unavailability. With WooCommerce vacation mode, you can manage employee workload and buyer expectations more effectively. This helps preserve your reputation, sales, and SEO.
Ramp Up CRM In Real-Time With Live Chat For WordPress Stores
Turning window shoppers into loyal customers is the e-commerce dream. To realize it, however, you’ll need to really put yourself out there. Usually, that means getting noticed through SEO or social media outreach. However, the need to communicate doesn’t stop once buyers find your website. That’s where live chat for WooCommerce comes in handy.
Like many other things, integrating live support and communication in WooCommerce is fairly straightforward. You’ll need the right plugin, as well as a plan for interacting with customers. Let’s start by discussing why this approach has remained a favourite for CRM-savvy businesses.
WordPress Live Chat: An Intuitive Solution
In many ways, online shopping has indeed simplified convenient buying. And yet, e-commerce websites enjoy still fewer conversions than their brick-and-mortar counterparts. That’s often because a virtual storefront lacks the all-important human element of interacting with a staff.
For many buyers, especially first-timers, a guiding presence can make for a reassuring shopping experience. Having someone offer guidance or assistance if you’re having any issues also proves useful.
Perhaps you need to ask for some product details. Or maybe you want someone to direct you to help or policy pages. If so, a WooCommerce live chat is a simple yet innovative and versatile solution.
For shoppers craving instant gratification and a frictionless buying experience, all it takes is one click. This feature offers a sense of connection and trust that the average online shopping experience fails to deliver.
How Live Chat Benefits WordPress Businesses
Aside from serving your audience, a live communication feature actively helps your business. The following are some key advantages highlighting this value proposition.
Improved Conversion Rates
A WordPress live chat function lets you address checkout roadblocks and other issues in real time. You can respond immediately to distressed buyers or offer tips for a better experience. This helps them complete their purchases faster, which benefits you in the long run as well.
Fighting Cart Abandonment
Buyers often feel unsure or overwhelmed at checkout, leading to abandoned purchases. Often, it stems from confusion regarding shipping or hidden costs. A brief chat with a staff member or outreach specialist can quickly alleviate these problems.
Superior Customer Experience
Sometimes, online buyers just prefer a sense that someone is out there looking for them. WooCommerce live chat offers a sense of tailored service that might be absent from email support. This helps fulfil requests and inquiries much more quickly. Thus, your buyers will be impressed enough to make return purchases and recommend your business to others.
Useful Insights
As it happens, a form isn’t as effective in getting information as talking to a real store worker. In getting to know your audience, you might find out pain points, product preferences, and feedback. This intel allows you to refine your offerings and leverage personalized marketing and outreach strategies.
Enabling Live Chat in WooCommerce: Step-by-Step
Using a WordPress live chat plugin is your best bet for being able to reach out to your customers. There are many excellent picks available.
One of them is HubSpot, which is a versatile, all-inclusive CRM solution for WooCommerce stores. Its live chat features include automated 24/7 support, Slack integration, various chatbots, and more. It also has a phone app which allows you to respond to chat requests on the go.
Plus, these features are available for free and are easy to avail. For now, we’ll be looking at enabling a basic live chatbot feature. Download and install the plugin before activating it. After that, just go as follows.
Step 1: Getting Started
- Navigate to the HubSpot CRM plugin through your WooCommerce admin panel.
- Through Hubspot > Live Chat, Enable the chatbot by clicking on Create chatflow.
Step 2: Set Up Chat
- In Display, set a preferred background colour for your chatbot pop up.
- After that, click Next. Under Chatflow, customize the name, team designation, and image for the chatbot.
- Add a custom welcome message for greeting your customers.
- Next, set chatbot availability. You can enable 24/7 availability or set it up during working hours for convenience.
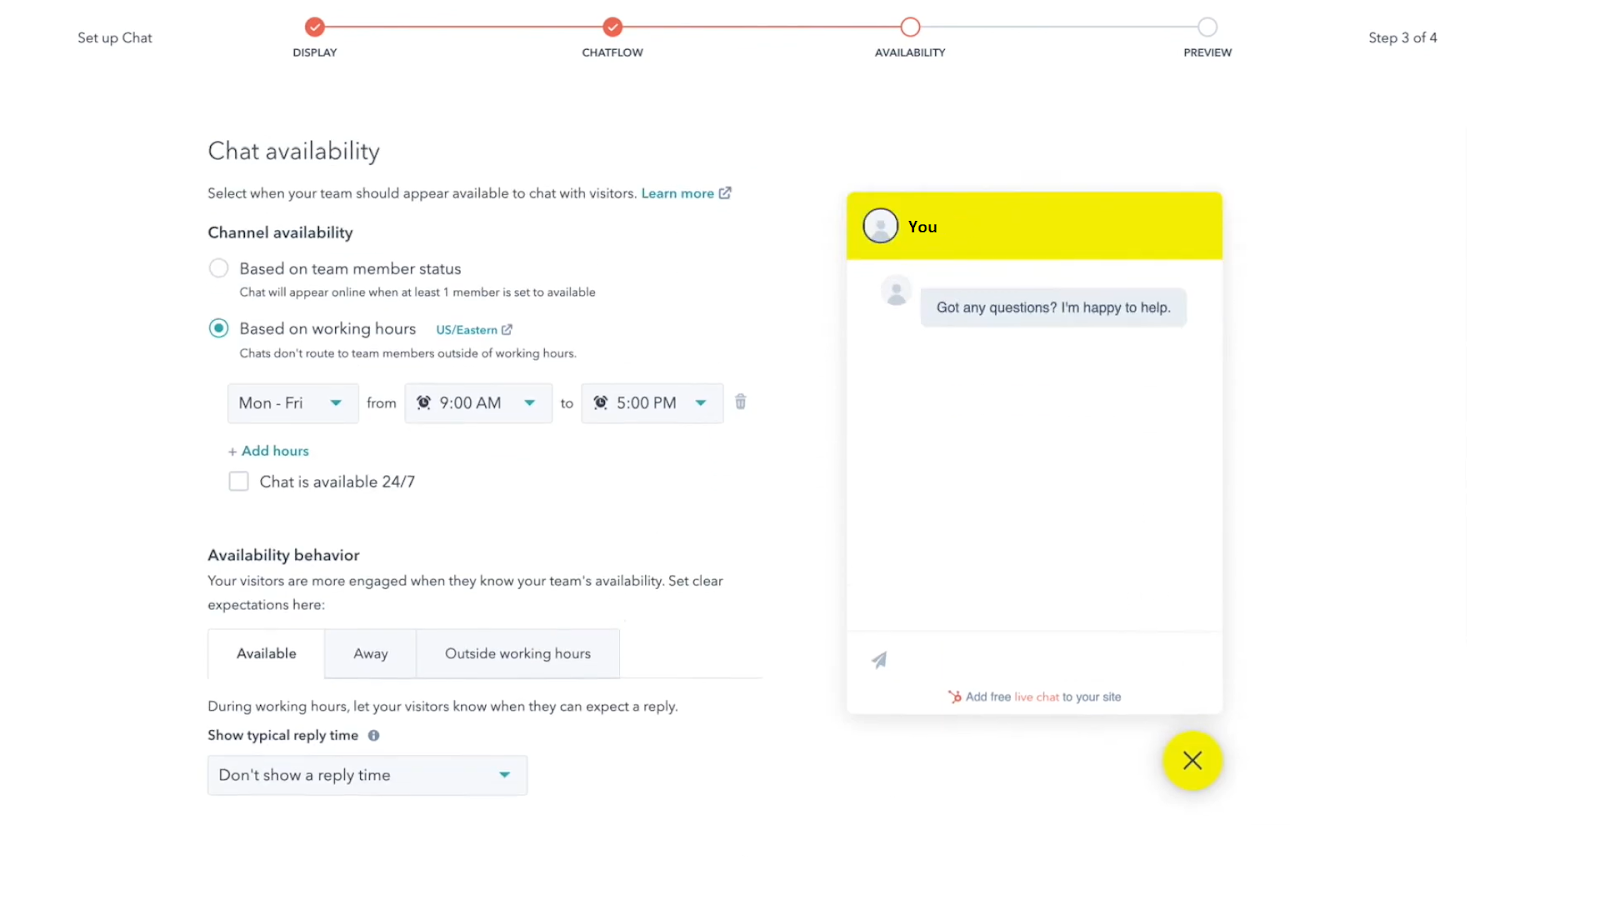
Step 3: Finalize
- Finally, Preview your chatbot for device-wide availability.
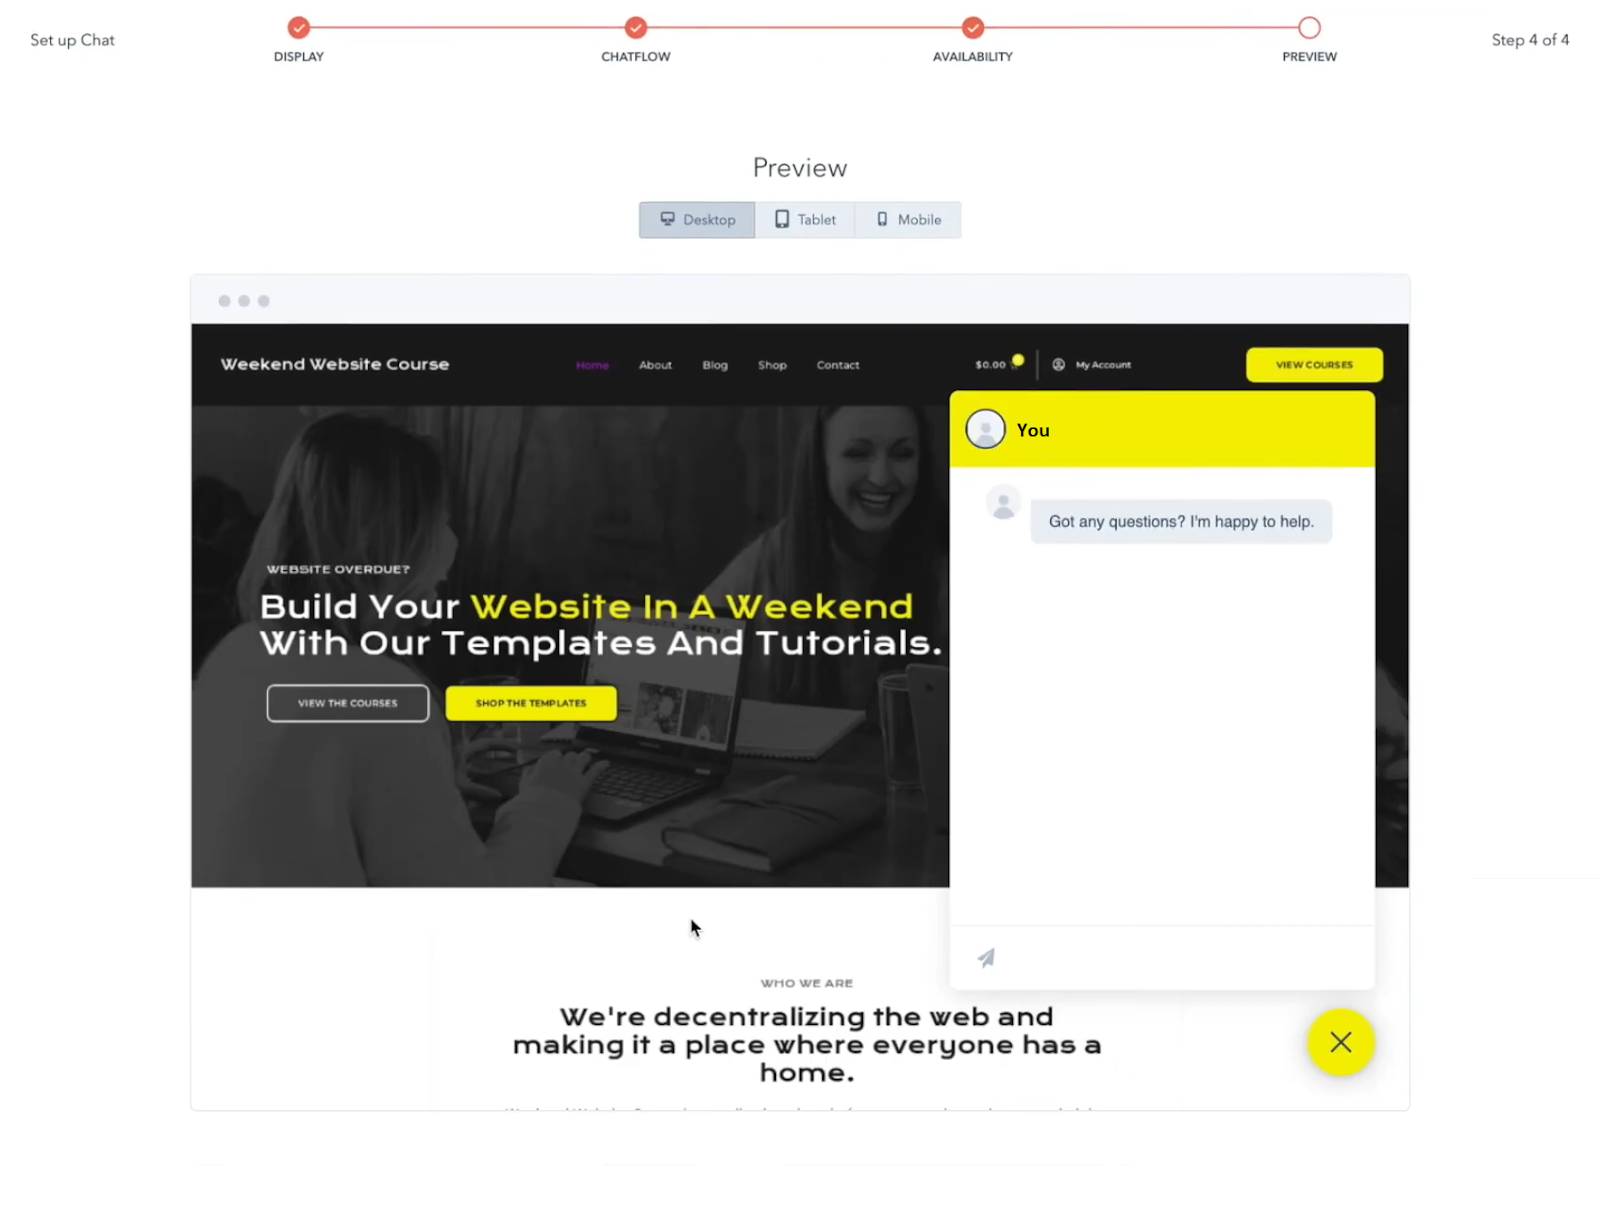
- Click Publish to enable the live chat in WordPress.
Best Practices for WordPress Live Chat
Here are some tips that can help you make the most of live chat in WordPress.
Preemptive Chat Invitation
Feel free to initiate first contact through a personalized or automated chat pop-up. This way, sites with moderate or high traffic can reach out to newcomers or lingering site visitors. Just make sure that it’s easy to opt out of and doesn’t affect the browsing experience, especially on mobiles.
Set A Window Of Availability
24/7 chat isn’t always a practical option for business owners. So, consider allotting and displaying the hours where you’re available for contact. During unavailability, you can send a message saying “We’ll be with you shortly” or something similar.
If you’re going forward with the 24/7 option, consider a chatbot or AI assistant for basic help. This helps address customer concerns while managing their expectations at the same time.
Don’t Keep Them Waiting
Try responding to live messages or chat requests as soon as possible. Ideally, the customer shouldn’t have to wait longer than 30 seconds. However, sometimes time constraints or the sheer volume or nature of requests might not make that possible.
In that case, add an expected response time to the pop-up. This can be up to a few minutes. Still, longer wait times up to half an hour can be common on high-traffic sites. In that case, add a thank you message for your customers’ cooperation.
Follow-Up Surveys
Asking chatters about their experience can offer useful insights for customizing user experience and other uses.
Reaching Out Made Easier
Effective CRM is a customer’s right, not a privilege. In that regard, enabling live chat in WordPress benefits both the seller and the buyers. With this guide, you’ll find that it’s fairly easy to activate and manage. Thus, your customers can enjoy the classic shopping experience that will keep them coming back.
A/B Testing for WordPress: 6 Tips For An Impactful Business
A great first impression is essential for securing buyers’ attention and trust. The best way to ensure an effective storefront involves double-checking each facet of your online store. This is where A/B testing on WordPress comes in. Finding out which version of your e-commerce strategy works best makes a huge impact on sales.
To find out more, it’s worth understanding how you can make the most of this process. We’ll be taking a look at some areas where split testing can make a difference. That way, you can expect results when you streamline your interface and UX.
A/B Testing: A quick refresher
A/B testing, also known as split testing, simply means taking and testing two versions of anything. The goal is to find out which of the two performs better among a test audience. It’s a common impression-boosting practice in many industries. Online, it’s an important part of web design, marketing, and other e-commerce essentials.
For instance, you might want to test which version of your checkout page performs the best. The variants in these cases can be the steps involved in checkout, arrangement of fields, adding direct checkout, etc. You can check which version experiences less cart abandonment and go with that.In practice, however, A/B testing in WordPress can be a bit more complicated. You need to know how to properly interpret data and make informed decisions for that. Fortunately, WordPress users have different tools that simplify split testing, like Nelio A/B testing or OptiMonk.
Getting It Right: 6 Essential WordPress A/B Testing Tips
To streamline your online store, you don’t need any over-the-top, complex setup for A/B testing. Just a few strategic tweaks can be enough to promote conversions. Here are some areas that are worth discussing when it comes to optimizing your store.
- Know What To Measure
To run a successful online business, it’s not just conversions that you need to track. While some things might click with users, others won’t so much. You need to take all of these into account to better understand your audiences.
Everything from the navigation to the label on your buttons can influence user behaviour. And if you can think of something else that can benefit from improvement, write it down.
So, on top of conversions, analyze metrics like traffic, bounce rates, cart abandonment, click-through rate, and shares. This offers a more thorough picture of how you need to set up your store for best results.
- Set Achievable Goals
Proper A/B testing can be time-consuming and takes up a lot of resources. So, having a vision and direction before you start is important. For instance, is the ROI of a complete theme overhaul worth the time and money spent testing different variants?
Start small, write down your objectives, and try conquering them one at a time. If you have any historical findings at hand, use them to determine how you’ll move forward.
- Pay Attention To Sample Size
A couple of dozen users don’t reflect an entire audience, even if you’re aiming for a selective demographic. Ensure that you have enough visitors to gather evidence that is statistically significant. If that’s not possible, consider a different strategy, like prolonging the testing period or measuring micro-conversions.
- Segment Properly
And even if you have enough traffic, your tests are useless without segmenting your audience. For actionable insights, you need to study their roles or how different users behave and interact.
You can use Google Analytics to differentiate these groups and test data based on these segments. Alternatively, if you have a CRM plugin, you can use that to divide users, track their behaviour, and analyze the resulting data.
- Personalize Where Needed
When testing themes or plugins, make sure that they are customizable. This flexibility gives you more to test, so you can explore further variants. Alternatively, you can personalize the tests themselves when choosing banners, coupons, and more. This offers a more relevant, conversion-boosting approach to content optimization.
- Have A Contingency Plan
Do make sure that your testing stage is fully covered before launching your website. If you’re making changes to an existing online store, however, it’s important not to affect user experience. For instance, a child theme lets you run tests without affecting the actual website.
Also, you need to avoid losing valuable assets when A/B testing in WordPress. So, back up site data and variants before you start testing. That way, you can revisit old designs or blueprints if necessary.
Help Your Business Be Its Best Self
A/B testing in WordPress doesn’t have to be rocket science. By understanding what the customers want, you can save yourself a lot of trouble. Businesses that provide minimalist design, an emphasis on UX, and accessible, mobile-friendly sites are already a step ahead.
Still, split testing is a great way to close any gaps and make your online store immaculate. Hopefully, this guide will help you navigate this process productively and with confidence.
Bump Up Conversions In WooCommerce By Skipping Cart Page
Selling online is a game of strategy and balance. UX matters, and it’s about keeping things easy and simple for buyers. This approach comes in many forms, from lightweight, performance-enhancing design to faster checkout. One way to accomplish the latter is to skip the cart page when clicking “Buy now”.
Sending buyers straight to checkout streamlines the process and improves customer experience. Plus, it’s a fairly simple task you can do in one of two key ways. But before diving into those, it’s worth understanding just how this simple tactic works.
Solving The Online Cart Abandonment Crisis
Cart abandonment is the inevitable foe that even careful, experienced entrepreneurs must face. In many industries, it can be as high as 70%, and even higher among mobile users. On one hand, it’s not something even brick-and-mortar stores can completely get rid of. However, you can manage it with the right tactics.
Understanding why cart abandonment occurs is essential if you intend to tackle it. Reasons can range from surprise costs, poor UX, and unfavourable shipping to a simple lack of interest in the product. By identifying and addressing each gap effectively, you can steadily improve conversions and sales.
How WooCommerce Stores Benefit From Skipping Cart Page
Speeding up the checkout process is a surefire solution to your cart abandonment woes. The faster the buyer can purchase their order, the better. There are several ways to do this, like enabling guest checkout, sticking to a one-page model, and reducing checkout fields.
Another useful example in WooCommerce is skipping the cart page altogether.
Typically, when you click Buy on a product page, the store adds it to cart before you can purchase it. From there, you must go to the cart and go through more steps before completing payment and having your order confirmed. This jumping through hoops frustrates customers, and you need to eliminate it.
Enabling The WooCommerce Skip Cart Option: 2 Easy Ways
We’ll discuss two simple methods for skipping the cart page in WooCommerce, i.e. natively and by coding. There is a third option, which to use a direct checkout plugin. However, if you’re already using a few plugins in your store, best not to crowd it with further extensions.
The solutions we’ll be taking a look at are straightforward, effective, and require no third party tools.
Method 1: Directly In WooCommerce
WooCommerce offers a by-default approach to enable skipping the cart. Here’s how it works.
- Through your WordPress admin panel, go to WooCommerce > Settings > Products.
- Look for the Add to cart behaviour section, and click the Redirect to the cart page after successful addition checkbox.
- In the Advanced settings, specify Checkout in the Cart page dropdown.
- Save settings.
As a quick solution, this method works well and is pretty straightforward.
Method 2: Using Code
Alternatively, you can use code snippets to skip the WooCommerce cart page during checkout. Just make sure to back up your store and prepare a child theme before using any type of code.
- Through your WordPress admin panel, go to WooCommerce > Settings > Products.
- Uncheck both options under Add to cart behaviour.
- Now, access the functions.php file through the theme folder.
- Add the following code snippet.
| /** * Redirect to checkout after adding to cart. */ function skip_to_checkout_on_add_to_cart($url) { return wc_get_checkout_url(); } add_filter(‘woocommerce_add_to_cart_redirect’, ‘skip_to_checkout_on_add_to_cart’); |
- While you’re at the functions.php file, change the label of the button from Add to Cart to Buy Now. Just use the following code.
| add_filter( ‘woocommerce_product_single_add_to_cart_text’, ‘cw_btntext_cart’ ); add_filter( ‘woocommerce_product_add_to_cart_text’, ‘cw_btntext_cart’ ); function cw_btntext_cart() { return __( ‘Buy Me’, ‘woocommerce’ ); } |
- Save the changes, and you’re done.
Understandably, not everyone is a master of coding. But WooCommerce is a beginner-friendly platform where edits like this are fairly easy. That way, you can enjoy custom editing without the hassle of another plugin.
Best Practices For Skipping Add-To-Cart
Notify Buyers
Not all customers might appreciate the urgency that direct checkout offers. So, in case any of them expect a redirect to the cart page, add a brief message under the Buy Now button. Informing them that the store will send them directly to checkout can help you avoid cart abandonment.
Have A Plan
Offer an alternative way to present features found in the cart page. For instance, without the add-to-cart interface, consider cross-selling or upselling during checkout or on product pages.
Consider A Dual Approach
Many stores offer both the Buy Now button and the Add-to-Cart button on product pages. This is useful if a customer wishes to add multiple products to cart or apply coupons. Meanwhile, the Buy Now button is there to offer direct checkout option for those in a hurry.
Use Other Checkout-Streamlining Methods
As mentioned earlier, skipping the cart page isn’t the only way to expedite checkout. Consider adding mobile-friendly forms, single-page checkout, and guest checkout options to speed things up. Strategically hiding or removing checkout fields can also be helpful.
More of these streamlining tactics makes each more effective than if you implement them individually. Remember, the less time spent from viewing a product to finalizing payment, the better.
Simplify Checkout And Reap The Rewards
In the tale of e-commerce, cart abandonment is the online store’s age-old foe. And while it’s not going anywhere, making checkout quicker and more user-friendly is a perfect, lasting solution for it. And allowing WooCommerce users to skip the cart is as simple and effective a way to do so as it gets.
5 Must-Have WordPress Analytics Tools And Plugins For 2024
The future of e-commerce isn’t revolutionary AI technology or clever marketing. It’s one thing to be able to provide goods and services. But to run any business, crunching the numbers can help you measure your progress. This is where having a quality WordPress analytics plugin makes all the difference.
With growing competition and new perennial trends, quality analytics tools have become essential. But to maintain stable profits, you need a statistical solution that is right for your needs. So, we’ll be looking at the top plugins to keep track of WooCommerce analytics.
Doing The Math From Your Shop Dashboard
Today, optimism and word of mouth aren’t enough to stay in business. Online stores enjoy a much lower conversion rate compared to brick-and-mortar retail. And while selling from the Internet has its benefits, it also has its costs. Thus, the aim is to put your hard work and precious earnings to good use.
Analytics help you track your store’s performance in terms of sales and user interactions. This reveals whether your overall shop strategy is going in the right direction or if it needs an overhaul. To truly benefit from analytics, however, you need to measure everything, including
- Overall traffic
- Conversion-to-bounce ratio
- Cart abandonment
- SEO
- Returns from marketing (social media, email, corporate videos, etc.)
The more aspects of your business you cover, the more insights you gain. This data is valuable for strategizing how to balance profits and outreach with cost and time management.
For WooCommerce stores, quality analytics plugins bring all these capabilities to your dashboard. Everything is already set up for tracking and presenting results in comprehensive, easy-to-understand numbers and graphics. All you need to do is install and activate the extension, and you’re good to go.
5 Best WordPress Analytics Plugins
As far as statistical tools are concerned, WooCommerce users are spoiled for choice. But some tools might be better than others, and we’ll be highlighting the best ones.
This is arguably one of the most popular and best Google Analytics plugins for WordPress. MonsterInsights combines a state-of-the-art array of measuring capabilities with an immensely user-centric interface.
Activating and configuring Google Analytics in WooCommerce stores can take a while. This is a simpler alternative where you don’t need a developer to set anything up for you. Just install the free, or pro if you’re interested, version and you’ll get a wide range of site reports on your dashboard.
Highlights
- Diverse analytics reporting.
- Block-based Google Analytics feature.
- Custom filters for easier reporting.
- Quick results with no code required.
For a more privacy-friendly approach to metrics and KPIs, WP Statistics is the tool for you. It is easy to integrate to WooCommerce and offers a straightforward dashboard. With it, you can track unlimited and detailed WooCommerce analytics.
The selling point of this tool, however, is that it collects data in a GDPR-compliant manner. So, if you’re concerned about your privacy, this plugin has it all. It doesn’t involve any external registration and offers you full ownership of the data you collect.
Highlights
- Customizable dashboard.
- Data privacy features (auditing, Do Not Track, zero cookies, etc.).
- Traffic-based configuration.
- SEO and marketing-centric tracking.
- Lists referral sources.
With fantastic features and scalability, Hubspot is a premiere solution for many small business needs. Its analytics features are some of the most advanced out there for WordPress users. It tracks everything with step-by-step reporting, and you don’t need coding for robust analysis.
If you’re new to analytics, however, it might be a bit overwhelming at first. But once you get around that, this is a worthy investment for tracking metrics and KPIs.
Highlights
- Versatile integration (Social media, Canva, CMS platforms, and more).
- Enables Event tracking and A/B testing.
- Ideal for customer segmentation.
- Automated emails and marketing.
Burst Statistics is yet another extension that renounces fuss in favour of simple use, with an emphasis on privacy. It’s easy to use, install, and configure, and offers a great many of its features for free. This also includes customer support and access to the most essential WooCommerce analytics data.
It too provides anonymous data that the shop owner has full ownership of. Plus, it can function without asking site users for cookies. That way, you get the stats you need without risking cookie-related bounce rates or cart abandonment.
Highlights
- Real-time reporting.
- WordPress native for top-tier configuring.
- Fully GDPR-compliant.
- Geo-tracking and data archiving for pro users.
This WordPress stats plugin markets itself as a leading alternative to Google Analytics. This matters because, while GA is open-source and business-friendly, it’s not the best choice privacy-wise. Also, with Independent Statistics, you don’t need to register an account from a different site,
This tool brings complete CMS integration and GDPR compliance to the table. This is one way in which it differs from setting up Google Analytics on WordPress.
It crucially aims to simplify analytics through a coding-free approach and independent data collection. On top of that, the features are endless. It’s the ultimate choice for online shops, bloggers, influencers, and other online users.
Highlights
- Stunning, user-friendly, and data-rich dashboard.
- Highlights top traffic sources and visitor geolocation.
- Portable, backup-friendly data storage.
- Long list of detailed data reporting and tracking.
Making E-Commerce Easier For Small Businesses
WordPress analytics tracking makes it easier for online businesses to set achievable goals. With the right resources, they can do so on a manageable budget as well. With this list of WordPress analytics plugins, you can pick the best tools for informed decisions and better sales.
6 Proven UX Solutions For Cart Abandonment In WooCommerce
There is a science and an art to selling online. Those who understand the needs and desires of their target demographic are more likely to convert buyers. However, even with the best ads and persistent email marketing, the problem of WooCommerce’s abandoned carts still needs to be solved in e-commerce.
The best way to tackle any problem is to explore as many solutions as possible. For online stores, like with all other website owners, it all boils down to user experience. With business savvy and attention to detail, you can design an online business that caters more effectively to your customers. Let’s discuss.
What Causes Shopping Cart Abandonment?
Online shopping has revolutionized how buyers and sellers interact, especially when it comes to helping small business owners earn a living. Still, there is one area where brick-and-mortar retail has the upper hand, and that is cart abandonment.
The average of WooCommerce abandoned carts is around 70 per cent for most industries. For mobile devices, it’s even higher at 85 per cent. And while it’s possible to reduce these levels, the fact is that eliminating cart abandonment is pretty much impossible.
A number of factors can prevent purchases from reaching fruition, including
- Poor store design
- Unavailable products or services
- Hidden charges and shipping costs
- Untrustworthy website
- Limited payment options
Obviously, since it can negatively affect your profits, solving the cart abandonment problem is a priority. On the one hand, you can recover lost sales through effective email marketing and retargeting lost shopping carts.
However, shopping cart recovery is just looking at one side of the problem. To prevent customers from abandoning their purchases, you must overhaul your shop. Luckily, with WooCommerce, that can be simpler than you think.
6 UX-Centric Ways To Prevent WooCommerce Abandoned Carts
A robust user experience, or UX, is one of the hallmarks of a healthy, thriving website. It’s one of the first boxes you need to tick if you’re to secure SEO and conversions.
How accessible and easy-to-use a shop website is directly influences cart abandonment rates. So, preserving your sales and online traffic relies on a reliable UX strategy. Any problem that your customers face while interacting with your businesses needs a powerful, lasting, and straightforward solution. For most websites, the list of possible approaches can be endless.
But online stores can employ a more streamlined, tried-and-tested set of tactics to keep buyers tuned in to their purchase. Here are some ways that can help you maintain purchases.
- Checkout Solutions
Cart abandonment commonly occurs as a result of checkout-related complications. This makes sense, as checkout is ultimately the step that leads to order fulfilment. And buyers might be put off by a complicated and lengthy process.
So, first and foremost, streamline your store’s checkout flow into a one-page or one-click solution. Offer instructions where possible and ensure validation for checkout fields where necessary.
Additionally, offer guest checkout in your store. Not all buyers will have an account with your store, and making that a necessity can drive off new buyers. Guest checkout is inclusive and leads to greater purchases from your shop.
- Mobile Fiest Design
The sad fact is that many online store owners fail to design a mobile-friendly website. This is a problem considering that smartphone users are among the leading demographic when it comes to online shopping. And they’re already too picky and inattentive to risk serving with poor user experience.
Make sure your website is optimized for responsiveness on all devices. Mobile-first design helps your website perform better on smaller screens while retaining equal accessibility on Desktop computers.
- Display Trust Signals
Suspicious, seedy web design and aesthetics leave a bad impression on buyers, leading to higher WooCommerce abandoned cart figures. To avoid making them skittish during their purchase, use security badges, highlight all customer reviews, and streamline payment gateways. Building trust like this works wonders in maintaining high conversion rates among your ideal audiences.
- Payment Gateways – Spoil For Choice
Regarding payment options, online buyers can have a range of preferences, From digital wallets and bank cards to regional gateways or even cash on delivery, ensure that your stores offer all of them.
After all, if you’re selling internationally, you’ll find that customers in many countries don’t have access to PayPal or Stripe. So, expanding their options increases your chances of making a purchase.
- Offer A Cart Saving Option
Buyers often incorrectly use the Add To Cart feature to save items for later. To solve this issue, offer a wishlist of cart-saving features to prevent interruptions in the order fulfilment process.
- Get Rid Of The Clutter
A lack of transparency when it comes to shipping costs and extra fees is perhaps the biggest cause of shopping cart abandonment. Making your policies and pricing upfront is much easier with simplistic, UX-centric web design.
Instead of flashy, screen-clogging elements, use CTAs, progress indicators, and highlighted e-commerce prices. This not only aids in decision-making, but also helps build trust among your customers,
UX Means Keeping Things Simple
Online customers are a notoriously tough crowd, which is why WooCommerce cart abandonment rates are so high. But you don’t need to address all of them. With these common sense UX-based solutions, you can provide a well-maintained interface for customers and increase conversion rates with ease.
2 Ways To Add Product Filters In WooCommerce: A Practical Guide
Over the years, online stores have increasingly catered to our online shopping needs in different ways. For most customers looking for products online, convenience is of the utmost importance. One of the major ways to facilitate their search is through product filters in WooCommerce, or any other e-commerce platform.
Adding product filters is a simple task, but one that truly elevates customer experience. Let’s explore the different ways to integrate this feature to your online shop.
Introducing WooCommerce Product Filters
Product filters enable shoppers to streamline their pursuit of the perfect items to add to cart. Usually, online stores provide the ability to sort products by price, date, reviews, and other criteria. This simple addition makes a world of difference for shoppers. But it doesn’t stop there.
Many options allow customers to aim for the perfect products without having to spend ages looking. So, product filters in WooCommerce can highlight products by
- Category
- Size
- Colour
- Brand or manufacturer
- Product rating
- Product features, and more
- Pricing and discounts
This makes it easier to find products that fit their aesthetic, special requirements, or price range. Plus, it boosts customer experience and fosters trust and loyalty among buyers.
How To Add Product Filters In WooCommerce
To create product filters you have two options. You can either do it manually or opt for a WooCommerce product filters plugin. We’ll be taking a look at both approaches and what they offer.
Method 1: Through WooCommerce
If you’re not big on plugins, you can opt for the default options for setting up product filters in WooCommerce. It basically relies on widgets to accomplish the results you need.
It’s not super detailed, but it’s perfectly suitable for small online stores. Plus, you don’t have to worry about plugin-related performance and compatibility issues.
Here’s how it works.
- Through your WordPress admin panel, head over to Appearance > Widgets.
You’ll be met with a range of options for filter widgets. Under AAPF Product Filters, you’ll find the three default options for product filters are
- By price.
- By attribute (colour, size, etc.).
- By average rating.
- Go to any of the provided options under Available Widgets.
- To activate each filter widget, simply drag it to the widget area.
And that’s pretty much it.
Method 2: Using A WooCommerce Product Filters Plugin
The aforementioned method offers a great start, but they have some limitations. First, there is less front-end customization for fonts, sliders, and other elements. Also, the page must refresh for the filters to apply. This is why you need the AJAX setup for product filters, which WooCommerce cannot provide by default.To overcome these and several other issues, your best bet might be to opt for a quality product filter plugin. We’ll be taking a look at how you can add filters with the Filter Everything plugin for WooCommerce.
- Install and activate the plugin.
- Navigate to the plugin through your WordPress admin panel.
- Go to Filters > Filter sets and click on Add New.
- Under Post Type to filter, select Products and click on Add filter.
- Under Filter By, select Product Categories.
- Set an SEO-friendly prefix for your filter.
- Set the type of front-end filter field through View in Widget.
- In the box near the top right, save your changes by clicking on Publish.
- In Filters > Settings, specify the pages where the filters must be applicable through
- To display filters, you can use the [fe_widget] shortcode or configure settings through Appearance > Widgets via the admin panel.
Using this tool, you can enable filters in the form of
- Filter chips.
- Sortable filters.
- Widget filters.
Plugins like this also enable websites to experiment with different filter types, advanced settings, and filter sets. Plus, they come with SEO settings, customizable hooks, and immense compatibility with other plugins, themes, and page builders.
Suffice to say that you get much more bang for your buck than the default approach.
Key Considerations Regarding Product Filters In WooCommerce
WooCommerce product filters are pretty much essential in this age of e-commerce. They streamline product searches, offer access to budget-friendly goods, and help buyers save a great deal of time without getting frustrated.
However, you can still improve upon the advantages they offer to buyers. Here are some special considerations when it comes to product filters.
Choosing The Right Pages
Instead of just the shop page, extend product filter options in product category pages and search results pertaining to a given search item. This further helps shorten the buyer’s journey towards checkout.
Mobile-Friendly Options
Your plugin might offer the option to rearrange or hide filters and widgets for smartphone users. This is important for maintaining a responsive, condensed webstore design for smaller screens while maintaining the functionality of product filters in WooCommerce.
Store-Specific Filters
Aside from the default options, many stores can add filters that sort or display products based on brands, models, and other criteria. However, you can take it one step further.
Add product filters that reflect your products, services, or business model. For instance, let’s say you have a dedicated category page for different types of pasta. You can add product filters based on cooking time, gluten content, or product type (noodles, macaroni, lasagna sheets, etc.)
Sort Out Your Store
There’s nothing that online shoppers appreciate quite as much as convenience and attention to detail. With product filters in WooCommerce, they can pinpoint the perfect purchase based on their preferences, price range, and feedback from fellow customers. And this guide should help you take WooCommerce product filters to the next level.
Managed Hosting For WordPress: 5 Things To Get Right
Running a successful business always has its fair share of responsibilities, and WooCommerce stores are no different. Sure, going digital has its perks, but the maintenance can be a whole other challenge. To meet most of the challenges these businesses face, investing in managed hosting for WordPress can make all the difference.
While it’s hard to go wrong with a good hosting service, it’s also not impossible to do so. Managed hosting is an investment, and a lot rides on making the right choices. Before we do that, however, it’s worth bringing some of you up to speed on this topic.
A Quick Refresher On Web Hosting
For a website to be available to users on the World Wide Web, it needs a platform. Web hosting provides that and makes sure that an online store remains accessible to users. This means not just being able to visit a website, but interact with it as online shoppers expect to do so.
Web hosting comes in different forms, each with its benefits that may or may not suit you. For WooCommerce-based business owners, managed hosting for WordPress is the ultimate solution. This is where a provider offers a dedicated host server and fulfils site security, performance, and other management duties, usually for a fee.
Why Go For Managed WooCommerce Hosting?
Running an online business can be tiresome work even without the hassle of navigating a hosting solution on your own. What you need is something that checks every box and frees you from a number of work-related hassles.
Here’s why a robust managed hosting plan is the ideal investment, even for small online stores. Some of the advantages of choosing WordPress managed cloud hosting include
- Round-The-Clock Technical Support
Technical difficulties can be devastating to businesses, so it helps to have access to prompt and dedicated support.
- Superior Performance And Security
Dedicated server access means having a server all to yourself. That way, you need not worry about host overcrowding, especially if you entertain moderate traffic. Plus, no shared hosting means a more secure online business.
- Scheduled Updates And Backups
Instead of having to update every single theme and plugin and back up all your data manually, simply automate everything. This ensures nothing is lost and you have time to focus on your business.
So, if you’re a small business owner, banking on dedicated hosting is a fruitful decision. But even then, it takes more than going through payment plans to get the most out of a host.
Managed Hosting for WordPress: 5 Essential Considerations
Understanding what you’re signing up for and what you expect is essential when it comes to web hosting. For inexperienced business owners, poor choices and missteps are to be expected, but there are ways to avoid them.
Here are some key considerations for dealing with managed hosting as a business.
- Be Careful When Choosing Providers
Managed hosting as a solution works, but not all providers are cut out for the job. Small businesses need all the help they can get. So, it’s important to make the best choice without compromise.
For instance, GoDaddy users might be drawn in by the vast repository of WordPress plugins and themes. However, issues related to performance, compatibility, and migration can make things difficult.
Similarly, Pressable is immensely affordable and feature-rich. But specific issues like no phone support and being subject to restrictive selling guidelines can put a damper on your sales.
Small online stores need more comprehensive hosting solutions, like those provided by Hostinger, NexCess, or Hustly.
- Scalability Matters
Quality managed hosting for WordPress isn’t always cheap, as evidenced by how well it works. Luckily, small businesses can enjoy premium features by choosing more affordable plans. All providers offer plans containing immense features and access for a reasonable fee.
But with time, your hosting needs might evolve, leading you to require more robust features. So, always be prepared to pay more for better service, by choosing a host that facilitates that process.
- Consult The Service Level Agreement
The SLA for each hosting provider contains all the details pertinent to your hosting provider. These include guarantees regarding uptimes, responsive support, and the degree of service you pay for.
Understanding these details streamlines your decision-making and helps you understand processes like updates, backups, and potential host migration. So, you can make plans and manage your expectations better as you navigate your newly hosted business.
- Don’t Take Traffic and Resource Requirements Lightly
The scope of your business should determine your choice of host provider and payment plan. The level of site traffic and resources used directly impacts even high-quality, secure WordPress hosting.
So, get an estimate of your average daily or weekly traffic and resource requirements to make the perfect pick. And, if possible, repeat this process at a later time as your traffic and resource usage changes. This should help you save money and avoid issues that come with these fluctuations.
- Be Prepared To Relinquish Some Control
In managed hosting, you pass on several key responsibilities like admin and site updates to the hosting provider. We’ve already discussed the advantages of that, but a major trade-off is having less control of your site.
You’re partially or entirely reliant on your provider. So, there might be less flexibility when it comes to server management and control panel access. However, to guarantee secure WordPress hosting, such restrictions might be necessary.
Besides, with a reliable provider, all of this usually isn’t a problem. Still, it’s worth knowing this to manage expectations later on.
Choose The Host With The Most
When it comes down to it, securing quality managed hosting for WordPress relies on research. The more you look into which provider works the best for you and what you’re getting, the better. As a small business owner, the above considerations can save time, money, and hassle, and allow customer experience to thrive.
Woocommerce Grouped Products: A Quick Guide For Online Stores
Increasing cart totals is a simple yet effective way to maintain sales and profits, even for established businesses. And there are many ways to achieve this, from cross-selling to minimum order discounts. But few approaches benefit both buyer and seller quite like setting up WooCommerce grouped products.
We know that product bundles and packages guarantee a more exciting online or in-person shopping spree. For WordPress-based businesses, the possibilities are endless depending on what you’re selling or to whom. We’ll be focusing on how to add grouped products in WooCommerce, once we discuss what they are and why they matter.
What Exactly Is “Grouping” Products In WooCommerce
In e-commerce, grouped products are related, often complementary goods that customers can buy together. These “groups” are different from product categories, where products fall under a classification like “stationery”, “sanitation”, or “sportswear”.
These could be entirely different or the same type of product from different brands. Either way, the key distinction is that it might not make sense to buy these multiple products from the same category. Their main purpose is to give product pages structure, like certain aisles in a physical store.
Meanwhile, WooCommerce grouped products, when bought together, make sense as an overall purchase. For example, after not painting for years, let’s say you’re buying a set of acrylics. Instead of purchasing just the tubes, it might be better to buy a package deal containing
- The tubes of acrylic paints
- A set of brushes
- A palette
- An appropriately-sized canvas
Grouped products might be available in pre-made packages, or as optional add-ins that buyers can customize at will.
Why Group A Product In WooCommere?
Grouping products is a versatile strategy that can make online shopping more flexible for shoppers. As for the business case, online stores can enjoy the following benefits.
- Higher Cart Totals
Encouraging buyers to purchase more products raises the overall value of each order. This can boost small business profits, especially if you win return visits from satisfied customers.
- Showcase Obscure Products
Buyers can discover lesser-known but useful products that would otherwise be gathering dust in warehouses. For instance, when buying a set of high-end kitchen knives, you can also purchase a sharpening tool and a non-slip cutlery cleaner. Many of these products are inexpensive, long-lasting, and deliver immense value to buyers.
- Customer Loyalty
WooCommerce grouped products add value proposition to purchases, meaning buyers get more bang for their buck. This is the case when bundles come with discounts, coupon codes, or free shipping. You’ll enjoy more trust and loyalty, leading to robust business.
How To Add Grouped Products In WooCommerce
To enable product grouping, there are a few ways that might or might not involve a WooCommerce grouped product plugin. We’ll be looking at the following methods.
- Manual implementation.
- Using a plugin.
Both methods are fairly simple and require no knowledge of coding. The difference is that one is fairly straightforward and basic, while the other offers greater flexibility, but potentially at a cost.
Method 1: Add a Grouped Product through WooCommerce
To do this, you need to start by instating a grouped product, and then add more items to that group. So, it’s basically you that’s determining which products get bundled. Simply sign in to WooCommerce and do as follows.
- Navigate to WooCommerce > Products > Add New.
- Specify the product name, description, image, category, tag(s), and other details.
- In the Product Data dropdown, select “Grouped Product” as the Product Type.
- On the left of the screen, click on Linked Products.
- Navigate the search option to select the products you wish to group with the parent product.
- Click Update and Publish.
As you can see, this is a fairly simple process that you can revisit to add new WooCommerce grouped products. However, there are some limitations to it, namely that you cannot view separate prices or images.
This method additionally solidifies some products as part of a bundle, meaning you cannot treat them as individual purchases. Plus, this method isn’t ideal for variations. This is where another approach might prove useful.
Method 2: Use A Grouped Products Plugin
As with everything else, a plugin can help set up grouped or bundled products with greater flexibility. There are several tools you can use, including WPC Grouped Product for WooCommerce, which we’ll be taking a look at.
- Install and activate WPC Grouped Product for WooCommerce.
- Through your WordPress admin panel, navigate to Product Data > Grouped Products when adding a new product.
- Search for the products in the bar and click (+) to add them to the group.
- Configure options like default quantity or text description.
- In General, set a price that is visible from the front end.
- Under Cart and Checkout, choose to include or exclude the $0 main product.
- To limit the quantity of a product to a single item per order, navigate to Inventory and click the Sold Individually checkbox.
- Publish your changes.
Although this method is also simple, it’s much more dynamic than the last one. This plugin lets you hide or display pricing, thumbnails, and plus/minus buttons for increasing or decreasing quantity for all grouped products. You can also alter price formats, select variations, label Add to Cart buttons, alter search settings, and do much more.
Additionally, this tool is free for online businesses. However, you can enjoy other features with the paid tool, like unlimited WooCommerce grouped products and free lifetime updates. That said, plugins are always to be used with caution, especially for WordPress shops.
Give Buyers More With Each Purchase
For a shop owner, giving maximum value for money is the best way to impress buyers through bundled purchases. WooCommerce grouped products make that even easier with the ability to customize orders with high-value goods available in one purchase. And if you’re also setting up this scheme, this guide should prove more than valuable.
WooCommerce Maintenance Mode: Everything You Need To Know
Running a successful business is a continuous, tireless process. For online stores, navigating WordPress updates and store revamps can be tricky. WooCommerce maintenance mode allows you to continue business during possible downtime. That way, you can keep up with improvements without losing traffic.
The best part is that this doesn’t require much technical know-how, as we’re about to learn. With, or even without, the right plugin, implementing maintenance mode is a straightforward process. Let’s go ahead and discuss.
Maintenance Mode: Keeping Changes Under Wraps
Maintenance is essential if you wish to keep your business alive and well. During this time, however, there is a need to change how customers can visit it. Consider it as adding a “coming soon” or “we’ll be back with you” message, but a bit more advanced.
There are various cases in which activating maintenance mode can prove useful. This includes site updates, page renewals, routine maintenance, or migrating to a new platform. Anything that requires extended downtime for a website is fair game.
This can be a fairly easy process, and it has a few key benefits.
- Transparency: Visitors might catch on that your site isn’t as accessible during maintenance. To keep things clear and professional, provide a banner disclosing that you’ll be temporarily unavailable.
- Adaptability: It’s the best way to prime your website against compatibility issues after major WordPress updates.
- Control: You don’t have to worry about unwanted interference with your website. You can make the changes you desire in a window that suits you and your business.
- Safety: Maintenance mode makes your online business more secure by restricting access as you make changes.
- SEO Advantage: Maintenance mode in WordPress helps preserve website performance and usability. This, along with the clear notice, helps sites maintain their SERP positions.
Having an insurance plan is essential if you’re website must temporarily go down. However, this is a process that needs to go smoothly. So, when setting up WooCommerce maintenance mode, make sure to
- Plan your site changes in detail and come up with a timeframe.
- Back up all your essential data beforehand.
- Configure your SEO settings.
- Communicate openly with your audience.
- Optionally, create a waitlist page to keep customers in the loop.
This ensures a frictionless process that gives your site full advantage of the time required to overhaul it.
How To Set Up Maintenance Mode In WooCommerce
Method 1: Use A Plugin
Using a maintenance mode plugin is a common route for WooCommerce stores, and for good reason. Plugins are easy to use, cost-effective, fast-acting, and highly effective at making the desired changes.
Several plugins can help you activate WooCommerce maintenance mode. One such tool is SeedProd, a free extension with which you can build several pages for redirecting users as your site is down.
The steps for using during your WordPress updates or migration are as follows.
- Register with and install SeedProd, then use the license key to activate it.
- Through your admin panel, go to SeedProd>Pages.
- Design your custom maintenance page with SeedProd’s builder.
- After designing your page, navigate to Page Settings>Access Control.
- In the Include/Exclude URLs radio buttons, select “Include URLs”.
- Add the URLs that you want to put in maintenance mode; this could be specific pages or the entire store.
- To the top right of the screen, click on the Save dropdown and click Publish.
- After publishing your page, head over to Landing Pages while using the plugin.
- Activate the “Maintenance Mode” or “Coming Soon Mode” slider.
Now you’re ready to make your changes. Once that’s done, simply disable WooCommerce maintenance mode by toggling the slider to Inactive.
Method 2: Use The .htaccess File
For activating WordPress maintenance mode without a plugin, a great option is to edit the .htaccess file. This task might be more labour-intensive than using a plugin, but it’s still reliable and highly customizable. Plus, there are none of the website performance concerns associated with using plugins.
All you need to do is access the file through your WordPress directory, either through the host file manager or an FTP client. Just make sure to back up the custom files beforehand.
Other than that, here’s what you need to do.
- Access the public_html folder and locate the .htaccess file.
- Create a maintenance.html file containing the maintenance page that your visitors will see.
- Upload and edit the maintenance.html file through the root directory.
- Configure the redirect rules as necessary before saving your changes.
Now, this method certainly looks quicker. But in practice, it requires a bit more technical expertise. Plus, there’s a lot less customizability and scheduling compared to utilizing a plugin. Still, it’s always worth discussing more than one viable way of doing anything.
An SEO-Friendly Health Check
Downtime can be a stressful time for online businesses. However, helping customers understand the situation makes the situation more bearable, especially with the promise of returning better than ever. With WooCommerce maintenance mode, online stores can navigate major changes or WordPress update issues with remarkable ease.
Add To Cart Button: Tips For Optimization And Best Practices
You might think that online shopping is all about great deals and compelling calls to action. Those definitely work, but to sell online like a pro, you need to iron out the finer areas of your online store. One such detail is the “Add to cart” button on your product page, which is how all customers officially start their shopping journey.
Store owners might not even pay that much attention to this seemingly inconspicuous feature, as it is a default of pretty much any product page template. However, it can play an important role in convincing buyers to make a purchase.
So, it’s worth understanding how best to present and position this option to your visitors. Let’s discuss.
The “Add-To-Cart” Button – E-Commerce’s Dark Horse
The button that allows buyers to start their purchase of a product might go by many names. The most common CTAs for this button are some version of “Add to cart”, “Buy now”, “Subscribe”, or “Book now”. Obviously, without them, there is no way for customers to buy or book anything.
In WooCommerce, the “Add to Cart” option is a default element of a product page. It usually appears below the product description, adjacent to the image. Right next to it is a dropdown menu where buyers can select the number of times they can add a single product to their cart, starting from the default of “1” item.
But make no mistake, these buttons aren’t just a pre-existing formality. With the right design and message, they can actively help businesses convert buyers faster. It all depends on presentation and knowing how to make the most of a good opportunity.
Customize Your “Add to Cart” Button
Simple changes like changing the colour scheme, shape, position, or CTA can affect your customers’ willingness to click. But we’ll get into choosing those criteria later.
If you actually want to make such changes to your “Add to Cart” feature in WooCommerce, you have two options. You can either use code hooks or a specialized plugin. Both have their advantages, and can help you transform the dreary old stock button into something more unique.
Method 1: Customize “Add to Cart” Using Hooks
If you’re equipped with a child theme and some understanding of CSS and PHP programming, coding is a free and versatile solution. For making basic changes, here’s a simplified version of what you need to do.
- Access Your Theme
Before you can make any changes to your WooCommerce product page, you need to access File Transfer Protocol, or FTP, server. You can do this either by using the hosting control panel or a specialized FTP tool like FileZilla.
- Enter The functions.php File
Head over to the theme folder and locate the functions.php file where you’ll be adding your custom hooks.
- Change The Text
For adding your custom text, here’s an example of the filter you must add to functions.php.
| add_filter( ‘woocommerce_product_single_add_to_cart_text’, ‘lw_custom_cart_button_text’ ); function lw_custom_cart_button_text() { return __( ‘My Custom Button Text’, ‘woocommerce’ ); } |
Remove the ‘My Custom Button Text’ portion and replace it with the text of your choice. It can be “Add to cart” or “Buy now”.
- Style The Button
The next step would be to customize your button’s look through CSS commands. Here’s an example.
| .woocommerce a.button { background-color: #a46497; color: #fff; border: none; border-radius: 3px; padding: 10px 20px;; } |
Here, the colours are represented by their CSS “Hex codes”, which are different for each colour. #a46497 is a mild shade of purple which the button appears in, while the text will be in white, thanks to the code #fff. Change this and the other settings to your liking.
- Finalize The Changes
Once you’re satisfied with the changes you need, save the functions.php and style.css files before uploading them back to the theme folder.
Method 2: Use A Plugin
Coding is generally effective, but only if you know how snippets and hooks work and where they need to go. But without experience or the right tools, it can backfire.
WooCommerce plugins can achieve the same, or even better results, without making any unwanted changes to your site.
One example is Custom Add to Cart Button for WooCommerce, which allows online stores to make quick, versatile, and consistent changes to their Add to Cart feature. You can use it to
- Change text
- Alter the button’s style
- Select and position Add to Cart icon
- Set up button animations and transitions
- Add hover affects, and more
To use this plugin, make sure that it’s installed and activated in WooCommerce. From there, simply do as follows.
- Access The Dashboard
From your WooCommerce admin panel, go to WooCommerce > Settings and click on the plugin.
- Create Button Rules
Under Create Rule, select the text, colour, icon, and hover settings for your Add to Cart buttons. On the right of settings, a real-time animation will show how your button will look like after each change.
- Apply Changes In-Store
At the end, just before the Save Rule, choose to apply your customized button either to a single product, a category, or the whole store.
- Finalize Your Changes
Click on Save Rule and check that your button has been customized.
Unlike coding, the best plugins for the job aren’t always free. But a quality, professionally developed premium plugin is a better investment than paying a professional programmer to do the job.
Removing Or Hiding The Button
If you’re new to e-commerce, the idea of disabling or altogether removing the Add to Cart option might seem a bit odd. But there’s a logic to this, and we’ll look at three different actions to understand why.
- Removing “Add to Cart”
If you’re displaying your products in catalogue mode or as affiliate items from an external site, it makes sense to remove this button. Meanwhile, if a product is out of stock at the moment, temporarily removing the Add to Cart button can save everyone’s time.
- Hiding “Add To Cart”
You may conceal the button and make it conditionally available to selected premium, registered, or exclusive customers. Aside from that, if you’re selling a unique, high value or limited edition item, you can hide the Add to Cart functionality and instead encourage buyers to enquire about pricing or bidding.
- Disabling “Add To Cart”
This action becomes useful if a product is out of stock or soon to be available, or until a buyer has selected or unselected all the necessary variation of some products to avoid erroneous purchases.
What You Need To Do
The simplest way to achieve this in WooCommerce is through the native settings.
- Navigate to Products>All Products.
- Select the product page where you need to change the Add to Cart option.
- Under Inventory, change the Stock status to “Out of stock”.
On the other hand, you can use CSS for more precise results.
- To hide the button globally, navigate to your theme via Appearance > Customize > Additional CSS and paste the following hook.
| .woocommerce a.button.add_to_cart_button { display: none; } |
- For individual products, you can disable Add to Cart by accessing functions.php and adding the following.
| add_filter( ‘woocommerce_is_purchasable’, ‘wpb_remove_add_to_cart_button’, 10, 2 ); function wpb_remove_add_to_cart_button( $is_purchasable, $product ) { if ( $product->get_id() == YOUR_PRODUCT_ID ) { return false; } return $is_purchasable; } |
Simply replace YOUR_PRODUCT_ID with the code of the unavailable or exclusive product.You can alternatively use a plugin like the Hide Price & Remove Add To Cart tool to hide, eliminate, or disable Add to Cart in WooCommerce.
Add to Cart Best Practices For WooCommerce
Aside from customization, there are some important considerations for designing or presenting your Add to Cart option. Doing that correctly can help you improve store purchases, sales, and conversions. Here are some useful tips that can help you.
- Elevate your button text with eye-catching CTAs like “Add to bag”, custom Add to Cart icons, or compelling details like discounts or time-sensitive offers.
- Use colour schemes that are consistent with your brand or store theme. Make sure that the text contrasts well with the background.
- Don’t just stick to the default themes that all stores use. Experiment with different shapes, edges, and colour schemes to attract attention. Consider adding highlights and animations.
- Place your Add to Cart button above the fold.
- For mobile sites, make sure that it’s responsive and present in the screen’s “thumb zone”. Design it like a sticky ad so that it stays on the screen even as you scroll.
- Integrate payment options to the buttons.
- Enable the Add to Cart option throughout the store, including product recommendations and store highlight sections for quicker conversions.
- Be sure to regularly test your button to see that it’s responsive, aesthetically in order, and effortlessly redirecting to checkout.
Conclusion
Clearly, there is more to the Add to Cart functionality than meets the eye. With prominent design and strategic placement, it can trigger more enthusiastic responses from buyers and help WooCommerce stores boost their traffic and sales.
Fight WooCommerce Cart Abandonment in 2024 With These 8 Plugins
For small businesses, maintaining high sales involves keeping their customers satisfied with their experience at all times. That means making sure that they don’t get frustrated or lose interest mid-purchase. And customer service has its challenges when you’re selling online.
Luckily, the right WooCommerce abandoned cart plugins can help businesses overcome these roadblocks. And that’s what we’ll be discussing.
An Achievable Approach To Abandoned Carts
Online customers are famously a tough crowd, as reports show around 7 out of 10 of them abandon their shopping carts. This is a lot more than offline shopping, as most of the dominant sales worldwide occur through brick-and-mortar retail.
However, that doesn’t mean there is no space for new businesses to thrive online. Tackling abandoned carts requires a thoughtful and well-planned approach. After all, the ease and immense choices of online ordering have caused attention spans to plummet and expectations to skyrocket.
What Causes Cart Abandonment?
Experts find that the main reason why cart abandonment is so high online is that buyers might simply want to find a better deal elsewhere, which makes sense. When shopping in person, you don’t quite have the luxury to glide from shop to shop til you find what you’re looking for. Online shopping very much facilitates that.
But that is a trend common among younger shoppers. Among upper age groups, a key concern that leads to abandonment seems to involve shipping costs. The logic here is pretty much the same. However, the problem is usually due to hidden or surprise charges. So, it is generally recommended to keep these details transparent.
Besides these issues, WooCommerce cart abandonment can be due to any of several causes. Poor site speed, unflattering product descriptions, lengthy checkout, or a lack of interest can all contribute. Also, you cannot rule out security issues, even though very few buyers say that that’s why they refuse to purchase something.
Key Areas In Abandoned Cart Recovery
What’s clear is that shopping cart abandonment is impossible to eliminate, no matter what, where, or how you’re selling. But you can certainly mitigate it with abandoned cart emails, fixing customer experience glitches, or offering competitive deals on their products.
However, there are other, more innovative ways to go about this. Here are a few worth considering.
Gamification
Consider giving away gifts for subscribers or coupons for specific steps in the checkout process. Incentives aside, this is a great way to capture the attention of buyers and convince them to stick a little longer. So, if they’re not interested in buying now, they can do so later.
Mobile-First Design
The rate of shopping cart abandonment among mobile users is the highest in e-commerce, at around 85%. Responsive web design and a robust social media presence can help online stores close this gap.
Smart Upselling And Cross-Selling
These two methods don’t necessarily help fight WooCommerce cart abandonment. But by recommending the right products to the right buyers, you can drastically improve average order values. This can help you break even from the losses of abandonment.
Inclusivity
Online shoppers often feel dissuaded if the shopping experience isn’t built according to their preferences or limitations. The solutions range from options like guest checkout to multilanguage store design and more accessible payment methods like debit cards or cash on delivery.
Timing
Cart abandonment in most local markets often peaks at certain windows during the day, often around the evening or early nightfall. Plus, online buyers tend to abandon their purchases in the later months, during holidays, than other times of the year.
So, think beyond spending your time and resources on abandoned cart recovery round the clock or calendar. Instead, focusing your efforts during or around these peak times can prove more effective and budget-friendly.
WooCommerce Cart Abandonment – 8 Plugins For You
The following are some premium quality, professionally developed plugins whose support and functions can help you recover lost sales without affecting user experience.
If you to manage a tight abandoned cart email marketing campaign, this is the plugin for you. Cartflow’s WooCommerce Cart Abandonment Recovery enables businesses to capture emails and set up a tailored marketing campaign. You can personalize emails with custom templates and decide when and how often to send these emails.
The great thing about this tool is that it provides you full control of your email campaign. This feature is free of charge, but it works even better with paid offerings like split testing and and automation.
Marketing properly and building a sales funnel can work wonders in recovering unfulfilled online shopping carts. It’s also time-consuming and a bit tedious. To rectify that, FunnelKit Automations can help you schedule repetitive yet necessary tasks.
It offers the ability to set up automated marketing and post-purchase sequences, along with compatibility with other e-commerce and cart recovery plugins. You can also create more simple emails and keep tabs on users abandoning their purchases. All in one nifty place.
Checkout is a vital step in online shopping, and a lot can go wrong if it’s not built for the job. Usually, lengthy or unresponsive checkout can cause buyers to lose interest mid-purchase.
With the WooCommerce Checkout Field Editor, you can finetune this step and create a more steady flow that keeps buyers interested.
You can use the WooCommerce checkout fields plugin to shorten your forms by deleting or hiding fields, implementing a one-page checkout, and making pricing and shipping more transparent.
Customers and online window-shopping enthusiasts often use the online cart as a wishlist rather than complete their purchases. To prevent WooCommerce cart abandonment, the WPC Smart Wishlist provides a more intuitive space for saving their most desired items for later.
It’s fast, customizable, and allows users to share their wishlists. They can even use it to arrange their selected products by name, price, dates, or other relevant details.
GamiPress is the perfect tool for offering rewards and giveaways to your users across their online shopping journey. Gamify your online store by awarding loyal users with points, rewards, or coveted ranks based on things like on-site activity, completing certain actions, or purchases.
Slow loading and unresponsiveness leads to greater shopping cart abandonment, especially on mobile devices. Jetpack Boost speeds up your online store’s performance through CSS optimizaiton, minified media, and lazy loading for larger images. This improves cart fulfilment by mitigating customer frustration, and is also ideal for SEO.
Sometimes, you need a little more than guesswork to combat lost sales like a pro. Google Analytics can help you track users who initiate purchases without completing them. It generates detailed and visual reports of your sales funnels, peak abandonment, and user sessions.
You can compare these WooCommerce cart abandonment metrics with traffic sources, overall activity, user roles, and the results of split testing checkout and other checkpoints. This provides a clearer picture of how you can address cart abandonment with pinpoint accuracy.
Exit intent forms and popups are a great way to persuade leaving users to stay on the website and complete unfinished purchases. By adding coupons to the equation, you can make this proposition more interesting.With Exit Intent Coupons, you can convince registered customers to stay through discount coupons and delightful offers. This tool enables abandoned cart recovery, increases revenue, and contributes to customer loyalty.
Conclusion
As online buyers get easily distracted or unimpressed, keeping them tuned in to their purchase can be a challenge. But WooCommerce cart abandonment doesn’t need an ultimate solution.
At most, it just requires that online stores address the causes and do their best to provide a solution. And with these tools, they can guarantee just that.