If you have gone through a smooth and hassle-free eCommerce shopping experience, it almost ends your buying job. Customize woocommerce checkout page. However, the last step is to undergo a checkout page that includes details of a buyer whether to complete the purchase or not. In this step, a buyer has to add payment and address details to complete the purchase. It’s a final decision from a buyer’s side that allows him to make a decision regarding the purchase.
Have you ever edit WooCommerce checkout page? It comes with no complications, and buyers feel comfortable while customizing checkout pages. The only problem that buyers face is the time they have to spend managing the checkout page, and frequent users do it with ease. On the other hand, new users always look for guidance.
Why Do You Need to Customize WooCommerce Checkout Page?
WooCommerce is a wonderful platform for shopping lovers, especially for those who wish to add or remove fields to enjoy shopping. The ultimate target is to increase the conversion rate and that’s the reason the WooCommerce checkout page comes into action. Despite its amazing launch, it varies from business to business and the purpose is to ensure a shopping experience with some options. Usually, it covers adding or removing page forms and collecting data from users to speed up the purchasing process and boost sales.
Additionally, it can be done through plugins as well, but using the WooCommerce checkout editor is the best solution. For those, who are new to online shopping and want to ease the checkout process, we’ve got you covered with some easy steps to make it happen. Regardless of age, our guidance is for everyone interested in using WooCommerce features. Let’s take a look at the guidance to customize the page!
Customize Your Checkout Page Using Code Snippets
If you’re looking for some unique ideas to modify the checkout pages without getting in touch with plugins, you need to know the art of using code snippets in WooCommerce. Here are some hooks:
Woocommerce default address fields
If you make any change to this field, it will surely affect the billing process on the checkout pages. So, you have to be careful while making changes and be well-informed.
Woocommerce shipping fields
If you make changes to this field, it will only affect the shipping fields and that’s not worrisome.
Woocommerce billing fields
In WooCommerce billing fields, minor editing leads to changes in billing fields.
Woocommerce checkout fields
Editing in this checkout field always affects the checkout page fields.
Despite looking at the changes in the WooCommerce fields, using the default address needs more clarity for checkout pages. Let’s look at how to add new fields!
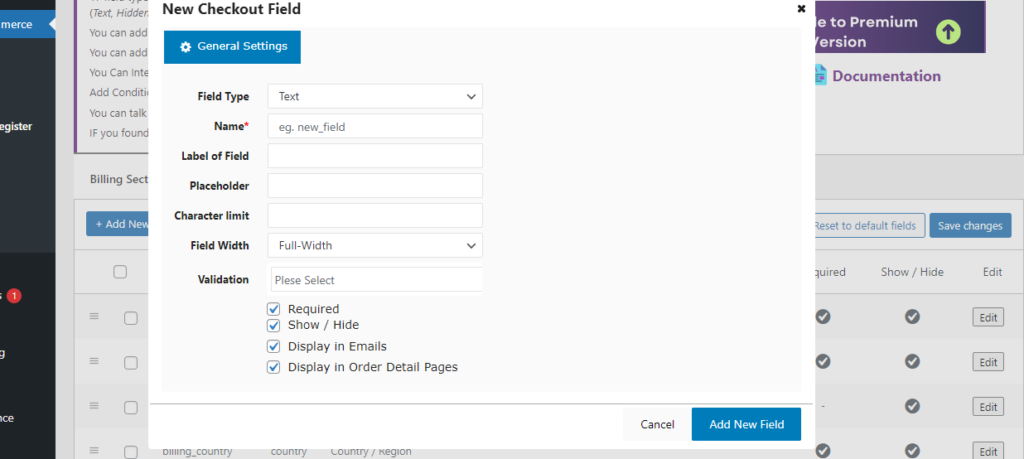
Add New Fields
If you want to add new fields to the page, you need to focus on the type, label, placeholder, class, required, label_class, and priority to handle the checkout pages. Type identifies the fields that require email, password, and text. Furthermore, you need class and label to manage custom fields, and don’t forget to add “required” to complete the fields requirement step. Above all, positioning is the best field to edit checkout pages and you do it by adding priority.
Let’s take a look at adding new fields using snippets!
add_filter( ‘woocommerce_default_address_fields’, add_field_jcodex);

function add_field_jcodex( $fields ) {

$fields[ ‘flat_number’ ]   = array(

‘label’        => ‘Flat number’,

‘required’     => true,

‘class’        => array( ‘form-row-wide’, ‘my-custom-class’ ),

‘priority’     => 35,

‘placeholder’  => ‘Enter your flat number’,

);

return $fields;

}
Edit fields
After you have added fields, the job isn’t over yet. You need to edit fields to better use code snippets. It assists a user in customizing the WooCommerce checkout page with different options, whereas placeholder name and label are the parameters to consider for two fields. You need to edit the placeholder and label to manage field editing and it comes after you add new fields.
Let’s take a look at the code snippet!
add_filter( 'woocommerce_default_address_fields', 'jcodex_add_field' );

function jcodex_add_field( $fields ) {

$fields[ 'land_mark' ]   = array(

'label'        => 'flat no.',

'required'     => true,

'class'        => array( 'form-row-wide', 'my-custom-class' ),

'priority'     => 65,

'placeholder'  => 'Enter flat no.',

);

return $fields;

}
Aligning fields
Edit fields work great, but you also need to align fields for example the width of the field, etc. For this, you may add strings to the class to align fields to keep the first and last rows wide. If we overview the default WooCommerce checkout page, we always come across first and last names side by side. So, there is always an option to align the fields using snippet codes.
Let’s take a look at the code snippet!
add_filter( 'woocommerce_default_address_fields', 'jcodex_add_field' );

function jcodex_add_field( $fields ) {

$fields[ 'land_mark' ]   = array(

'label'        => 'Flat Number',

'required'     => true,

'class'        => array( 'form-row-first', 'my-custom-class' ),

'priority'     => 65,

'placeholder'  => 'Enter your flat number',

);

return $fields;

}
Repositioning fields
If you want to know more about the WooCommerce checkout page using snippets, you may also reposition the fields from the top and bottom. Make sure, you are aware of the priority of existing default fields before repositioning the new fields. It is all about changing the values while using the code.
Let’s take a look at the code snippet!
add_filter( 'woocommerce_default_address_fields', 'jcodex_add_field' );

function jcodex_add_field( $fields ) {

$fields[ 'flat_number' ]   = array(

'label'        => 'Flat number',

'required'     => true,

'class'        => array( 'form-row-wide', 'my-custom-class' ),

'priority'     => 35,

'placeholder'  => 'Enter your flat number',

);

return $fields;

}
Remove Fields
Removing fields also plays a vital role in code management, especially when we talk about WooCommerce stores. However, it’s easy to remove fields using code snippets, but you have to keep in mind the mandatory fields that you can’t remove at all e,g. Country fields, name, and address fields from a checkout page, as these are a must to complete the purchase. So, there is no option of removing such fields, but you can remove options fields to customize the WooCommerce checkout page.
Let’s take a look at the code snippet!
add_filter( 'woocommerce_default_address_fields', 'jcodex_remove_fields' );

function jcodex_remove_fields( $fields ) {

unset( $fields[ 'address_2' ] );

unset( $fields[ 'state' ] );

return $fields;

}
Customize Your WooCommerce Checkout Page With JCODEX Custom Checkout Field Editor
If you aren’t a tech-friendly user or code lover, JCODEX has got you covered with bespoke custom solutions for your WooCommerce checkout page. We support users with a WooCommerce checkout manager and plugin that allows users to add, delete, edit, and modify the fields with ease even without seeking the help of experts. Using this wonderful plugin, you can make easy and smooth customizations to your checkout form. For sure, WooCommerce custom checkout field editor always facilitates users.
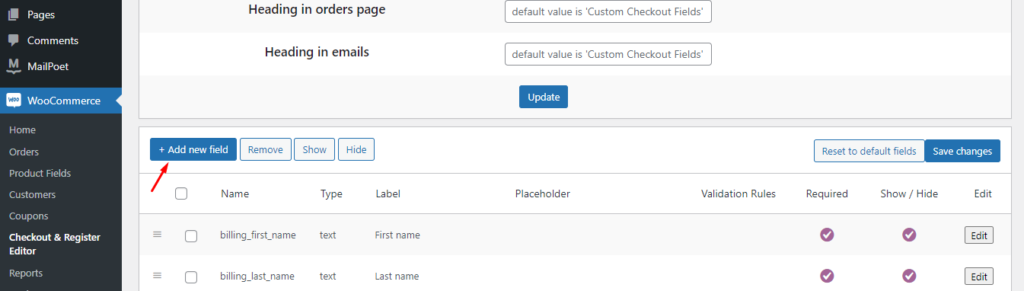
JCODEX has created easy-to-understand custom checkout steps to edit the WooCommerce checkout page. The choice is yours whether you select free and paid plugins to test checkout pages. You’ll come across differences between freemium and premium fields.
Free version fields include the option of adding text, number, password, email, phone, checkbox, and radio features. On the other hand, premium version fields offer time picker, date picker, file upload, custom text, checkbox group, etc.
Final Thoughts:
Conclusively, WooCommerce checkout field editors can be handled in several ways. The first is to use the code snippets and it works in several ways to add, remove, and edit fields. On the contrary, the WooCommerce checkout editor plugin seems to be the smartest option compared to all hooks and techniques. It is easier to manage, even beginners can customize WooCommerce checkout page.